
The Craft of Ansel Adams: Photographer Spotlight
To describe the essence of Ansel Adams’ photography, one might point to this description he gave of his famous Moonrise, Hernandez, New Mexico:
My Moonrise, Hernandez, New Mexico has the emotion and the feeling that the experience of seeing the actual moonrise created in me, but it is not at all realistic. Merely clicking the camera and making a simple print from the negative would have created a wholly different–and ordinary–photograph. People have asked me why the sky is so dark, thinking exactly in terms of the literal. But the dark sky is how it felt.
This is the response of someone who has spent years mastering their craft. This is the response of a genuine artist, someone who aims to capture the true experience of a thing and allows others to share that experience through their medium of choice.
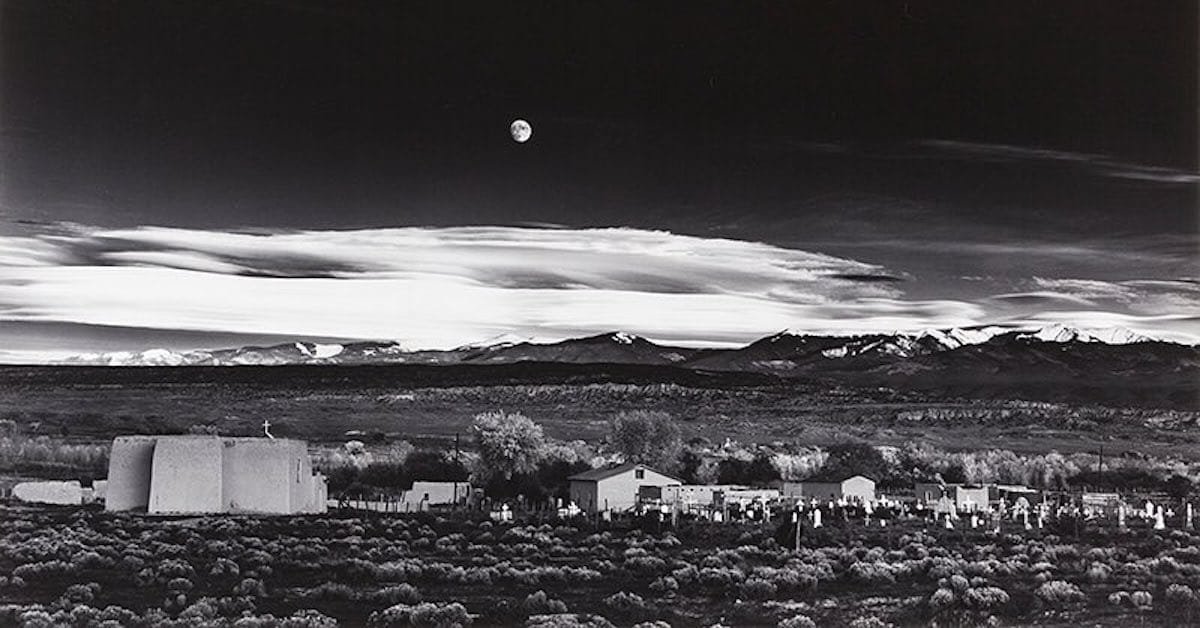
Moonrise, Hernandez, New Mexico
And we shouldn’t be surprised. It is Ansel Adams, after all, one of the few photographers the general public knows by name. His striking landscape photography touched a deep-running vein in the American psyche, capturing in image form what it meant to experience the West in its full splendor. Some have called him “the last and defining figure in the romantic tradition of nineteenth-century American landscape painting and photography.”
Other writers have said, “Adams’s technical mastery was the stuff of legend.” With his artistic vision in mind, he pushed the available technology to its limits to produce the photos he wanted. Although Adams worked primarily with film, some of his principles have carried over to the digital age, another testament to his impact on the craft of photography.
In a way, artistic craft is the bridge that connects an idea to its completed piece. You can have an idea for a work of art, but without craft, you’ll never be able to create it. You can also have the means to create an object, let’s say a piece of furniture or a print, but without an idea or inspiration, you’re little more than a factory machine creating the same thing over and over again.
At Artisan Obscura, we’re passionate about craft. Perhaps you first started taking photographs because you saw one of Ansel Adams’ incredible black and white photos in a book years ago. Or you like an aspect of his craft and want to apply it to your own unique photography style. Whatever your motivation, we’re here to take a look at Ansel Adams’ photography. Enjoy this article as we dissect the ways Ansel Adams brought his artistic visions to life through technical mastery.
Where Did Ansel Adams Get His Ideas for Photographs?
Ansel Adams was born in San Francisco, California to a rich and conservative family. This upbringing, together with a freak accident that left his nose markedly off-tilt, led to a lonely childhood. His parents were standoffish, and Adams found it difficult to make friends at school.
And so he started hiking around Golden Gate, developing a love for the outdoors.
Eventually, he visited Yosemite National Park, and from that point on visited nearly every year of his life. According to Adams’ biography, “In 1919 he joined the Sierra Club and spent the first of four summers in Yosemite Valley, as ‘keeper’ of the club’s LeConte Memorial Lodge.”
One of Adams’ favorite pictures came from one of these trips. In a New York Times feature, Louise Story recounts, “Adams first visited Yosemite in 1916 when he was 14 years old. On that trip, he hopped up on a tree stump to take a photo of Half Dome, then stumbled, headfirst, and accidentally pushed the shutter release. The upside-down image remained one of Adams’s favorites, he wrote in his autobiography.”
It’s clear that Adams’ early childhood pushed him toward nature as a subject. People, it seems, did not provide the same sense of belonging and wonder that a forest or majestic mountaintop could. As we saw with Moonrise, Hernandez, New Mexico, there was a feeling worth capturing in beautiful, lonely spaces.
Community
Throughout his life, Ansel Adams was part of many different communities that supported his art. He gave public lectures on photography and spoke to conservationist groups. However, perhaps his most formative community was Group f/64. Named after the widest possible aperture at the time, Group f/64 was made up of photographers who rejected the then predominant aesthetic of soft and impressionistic landscapes. Using f/64 meant every detail of a photo would come out crisply and sharply, a style that aimed to “celebrate rather than disguise the medium’s unrivaled capacity to present the world “as it is.”
Archives are full of conversations between Ansel Adams and other artists. He did not work in a bubble. Rather, he allowed his ideas to cross-pollinate with other styles and visions, which led to his own unique artistic look.
Visualization
Of course, liking nature and having like-minded friends is not enough to make one a famous photographer. One must also have a specific vision for each piece or at least be patient enough to muddle toward clarity as a writer might do with a short story. In Adams’ case, he had to move from taking a picture of El Capital, for example, to taking the specific picture of El Capitan
Ansel Adams honed his vision for his photographs through a process called visualization. Today, some refer to this technique as “previsualization,” but the concepts are the same. Visualization requires the photographer to take in a subject without a camera and imagine how the final photo will come out. The photographer must consider framing, light, and color. Nothing is random. Does the photo need to be shot in such a way that lends itself to a specific post-processing technique? Effective visualization gave Ansel Adams total control over his craft.
As Adams’ said, “A good photograph is knowing where to stand.” Presumably to match his earlier visualization.
How Did Ansel Adams Produce His Photographs?
Many amateur photographers find subjects they want to take photos of, but somewhere along the line, the idea doesn’t end up matching the final product. Perhaps they didn’t meter light correctly, or they went heavyhanded on the Lightroom sliders. Ansel Adams was a master at both composition and post-processing, and there’s much to learn from his techniques.
People who knew Adams have said he worked for eighteen or more hours per day for weeks on end. The only thing that stopped him was sickness when his body eventually gave out and he was forced to rest for a few days. But for better or worse, this obsession with technical photography made him a master. He even served as principal photographic consultant to Polaroid and Hasselblad and, informally, to many other photographic projects. He produced ten volumes of technical manuals on photography, which are the most influential books ever written on the subject.
Ansel Adams’ Zone System
The Zone System is perhaps Adams’ most famous technical achievement. If you look at one of his photos, you’ll immediately recognize the deep contrast of his landscapes. Skies look extremely dark. Cliff faces are bright. Rarely do sections fall into complete shadow or get lost in bright whites. In short, Ansel Adams uses the full range of the camera to capture maximum detail.
The Zone System is how he did it.
In short, the Zone System is used to measure the light of high-contrast scenes to retain as much detail as possible. Mid-tones are given a value of five (or V in Roman numerals). Another section of the scene might be darker, so it would have a value of four (IV). Brighter elements like clouds would have a value of six (VI) or seven (VII). There are 10 zones in total.

The zone system is important when you’re forced to choose which visual information to save in a shot. Sometimes even the best cameras can’t handle a high dynamic range scene with bright brights and dark darks. Imagine taking a photo with the sun on the horizon. If you adjust for the sun, everything else will come out underexposed.
A very helpful Zone System tutorial summarizes the Zone System’s usefulness this way: “The vast majority of the time, the answer would be to protect the highlights and let everything else fall where it may. Unless the highlighted area is actually too small to ruin the shot, not of much significance, or necessary to the whole idea behind the photo, you should always protect your highlights.”
Here, we return to the idea of visualization. If you know how you want your subject to turn out and how you’re going to edit the photo in post, then you can under or over-expose your photographs in order to preserve the most important visual data. Using the Zone System allows you to confidently set your exposures and make correct choices without having to guess.
Post-Production: Dodging and Burning
For many modern photographers, we think of dodging and burning as filter options in Photoshop. But back during the age of film, these were darkroom techniques used to manipulate images. Ansel Adams was a master of these techniques. Dodging means reducing the exposure, and burning means increasing the exposure.
Adams tried to “expose for the shadows; develop for the highlights.” Today, that formula is flipped due to how digital cameras process light – it’s harder to salvage blown-out whites in a photo editor. But the principle is the same. Expose for highlights; edit for shadows.
Either way, learn the craft of post-production. When Adams died, he left behind unfinished negatives to various organizations. One article reports, “The negatives are famous for being nothing like the prints Ansel produced… most of the magic was created in the darkroom.”
It’s not cheating to use Lightroom. As long as you’re accurately representing your artistic vision, all tools are at your disposal. In fact, Ansel Adams (he died in the 1980s) was very excited about the possibilities of digital photography.
Ansel Adams’ Legacy
Today, photographers and non-photographers alike are inspired by Ansel Adams’ breathtaking photos. Few people have spurred on support for the National Parks like Adams. And students are still learning from his craft years after his death.
In 2019, the Museum of Fine Arts in Boston hosted an exhibit called “Ansel Adams in Our Time.” The exhibit showed over 100 of Adams originals alongside photos of artists who had been inspired by his art.
An overview by the New York Times reveals:
Mark Klett and Byron Wolfe incorporated pieces of earlier photographs into their own collaboration on exhibit here, stitching a time sequence into a single image. They photographed the view from Glacier Point overlook at exactly the spot where Carleton Watkins had stood, then replaced portions of their color photograph with a fragment of Adams’s and a fragment of Watkins’s photographs of the same view.
Catherine Opie takes highly colored, out-of-focus pictures of Adams’s territory in the national parks. In a video at the exhibition, she said that she wants people to know what they are looking at but to question it, an act of witnessing that one click on an iPhone, one glance at social media, does not create.
Ansel Adams continues to be a titan of photography not only for his technical prowess but also for the emotional responses he evokes in his audiences. Even today, photographers are searching for ways to contribute to the visual conversations he started. Ansel Adams was not just someone who recorded what he saw; he sought the deeper feelings of the human soul.
He even said it himself: “In 1930 I was in Taos, and Paul Strand showed me his negatives. They were so gorgeous, they confirmed my urge, and I said, ‘That’s it. I want to be a photographer.’ Some friends said, ‘Oh, don’t give up music. A camera cannot express the human soul.’ The only argument I had for that was that maybe the camera couldn’t, but I might try through the camera.”
And so, don’t give up trying to express the human soul through your camera. Inspire your craft. Keep going.